Assigned: Monday, November 11
Due: Thursday, November 21, 2019 by 11:55pm
For this program, you will be modifying image files. The image format we are going to use is PPM. Don't worry if you're not familiar with PPM images. The format of them is described below.
While PPM files are easy to view as text (you can use Notepad, for instance), and easy to work with in code, they are highly inefficient. Most modern image formats use some kind of compression to make their size reasonable while preserving the image appearance. This is not to say that PPMs don't still have some life in them--one modern use for PPM is an intermediate format when converting images from one type to another.
You will need to install a program to view these images on a Windows machine. Irfanview is a small download and works quite well. It will also allow you to convert your own images to PPM so you can practice with pictures you took in the past (keep in mind that you may need to make them very small or the resulting PPM will be quite large!).
The PPM image format is encoded in human-readable plain text. A PPM image has two main parts:
The header is always the top three uncommented lines in the file:
P3
4 4
255
The first line specifies the image encoding that is contained within the file. We will always use the "P3" specification. The second line specifies the number of pixel columns and rows present in the image. In this example, we have a 4 pixel by 4 pixel image. The final number indicates the maximum value for each red, green, and blue (RGB) element in the picture. We will always use a max value of 255.
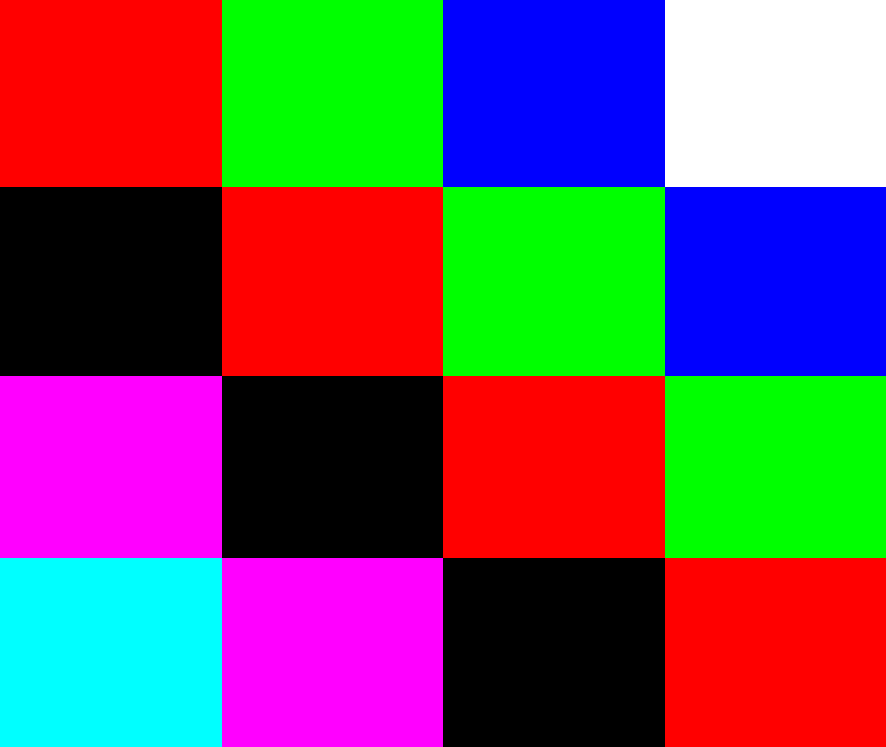
Below the header is the body of the PPM file. Each pixel has a red, green, and blue value. For example, the body content of our 4x4 image might be:
255 0   0       0   255 0      0   0   255    255 255 255

0   0   0       255 0   0      0   255 0      0   0   255

255 0   255     0   0   0      255 0   0      0   255 0

0   255 255     255 0   255    0   0   0      255 0   0
With these values, the pixel in the first column and first row has a RGB value of (255, 0, 0), which equates to red. The pixel in the last column and the first row has a RGB value of (255, 255, 255), which equates to white. A blown-up image containing these values would look like:

Note: You can explore RGB color values at this website.
Download this PPM image of the Rhodes College Byran Campus Life Center: BCLC.ppm. Again, you can open the image with software such as Ifranview to view it as an image. You can also open it as a text file (using a text editor) to view it as plain text (useful for debugging your code!).

Write a program to prompt the user for the name of an input PPM image. Prompt the user for what modifications they would like to make to the file. Options should be:
Your program should output (write) a PPM file with the modifications made to the input PPM file. The output file name should include your name as well as the modifications that you did to the file.
>>> makeOutputFileName("BCLC.ppm", '2')
'BCLC_welsh_catie_negate_blue.ppm' >>> makeOutputFileName("test_lots.ppm", '9')
'test_lots_welsh_catie_grey_scale.ppm'
>>> negate([1, 2, 3, 200, 100, 150])
[254, 253, 252, 55, 155, 105]
>>> flatten([1, 2, 3, 200, 100, 150])
[0, 0, 0, 0, 0, 0]
>>> flip_horizontal([2, 1, 5, 4, 3, 6])
[6, 3, 4, 5, 1, 2]
>>> grey_scale([1, 200], [2, 100], [3, 150])
[2, 150], [2, 150], [2, 150]
Here are the image files to compare with:
When your output image files look the same as mine above, you can be reasonably sure that your program is working.
It will be helpful to test your code on a much smaller example as well. Here is the test.ppm file that is in the PPM image format description above. While you won't able to "see" the image well - it is very tiny - it will be much easier to view the text file and check it for correctness.
Through Moodle, turn in your code as a file called
yourLastName_yourFirstName_prg8.py.
Your program will be graded on correctness, as well as on coding style, which refers to choices you make when writing your code, such as good use of variable names, appropriate indentation,
and comments (this is not an exhaustive list). See the syllabus for further grading details.
You will receive one bonus point for every complete day your program is turned in early, up to a maximum of five points. For instance, if your program is due on September 20 at 11:59pm, if you turn in your code on Moodle any time on September 19 from 12:00am through 11:59pm, you will receive one extra point on your project. Programs submitted on September 18 from 12:00am through 11:59pm will receive two points. This pattern continues for up to five points.