Starting a CLion project

These are the steps you can follow whenever you want to start a new CLion project
  1. Start CLion. If no existing project is open, click New Project from the window. If a project is already open, choose File -> New Project.

  2. Choose a project name that is all one word, and put it at the end of the "Location" text box. This is the folder on your computer where all your project files will be stored.

  3. Click "Create."

  4. You may see a dialog box asking whether you want to open the project in a new window or replace the existing window. No matter what you pick, your old project(s) will still be there. If you're done with your old project, click "This Window," otherwise click "New Window."

  5. After a short wait, you will see a short boilerplate C++ source code file.

  6. To compile and run your project, look in the upper right corner of the window for this area:

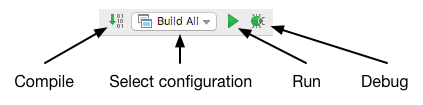
    Note that if you just created the project, you may see messages in the status bar at the bottom of the screen about "indexing" or "building symbols" and the compile/run area will be grayed out. Wait until these messages disappear and the buttons will become active.

  7. Click the select configuration area, which is probably set to "Build All," and select the name of your project, which should be the last option in the list.

  8. Click the Run button and your program should run (it will be automatically compiled if necessary).